Edit the fields
Everything about which fields a shot selects file has, or a preset gives new files, happens in the Fields window. When you are done, the detail panel shows the new fields for every shot in the file.
Before you start
- Know whether you are changing this file or a preset. A preset shapes files you make from now on and never changes one that exists; see Field presets.
Steps
- Choose Shots › Fields…, or Settings › Field Presets…. Both open the same window.
- On the left, pick what to edit: a preset under Presets, or a file under Open shot selects. Its fields fill the table on the right, in the order the detail panel shows them.
- Make your changes in the table (the sections below).
- Choose the save button under the table. Saving into a file asks first and is one undo step there. Saving a preset changes new files only and cannot be undone with Ctrl+Z, so save when you mean it.
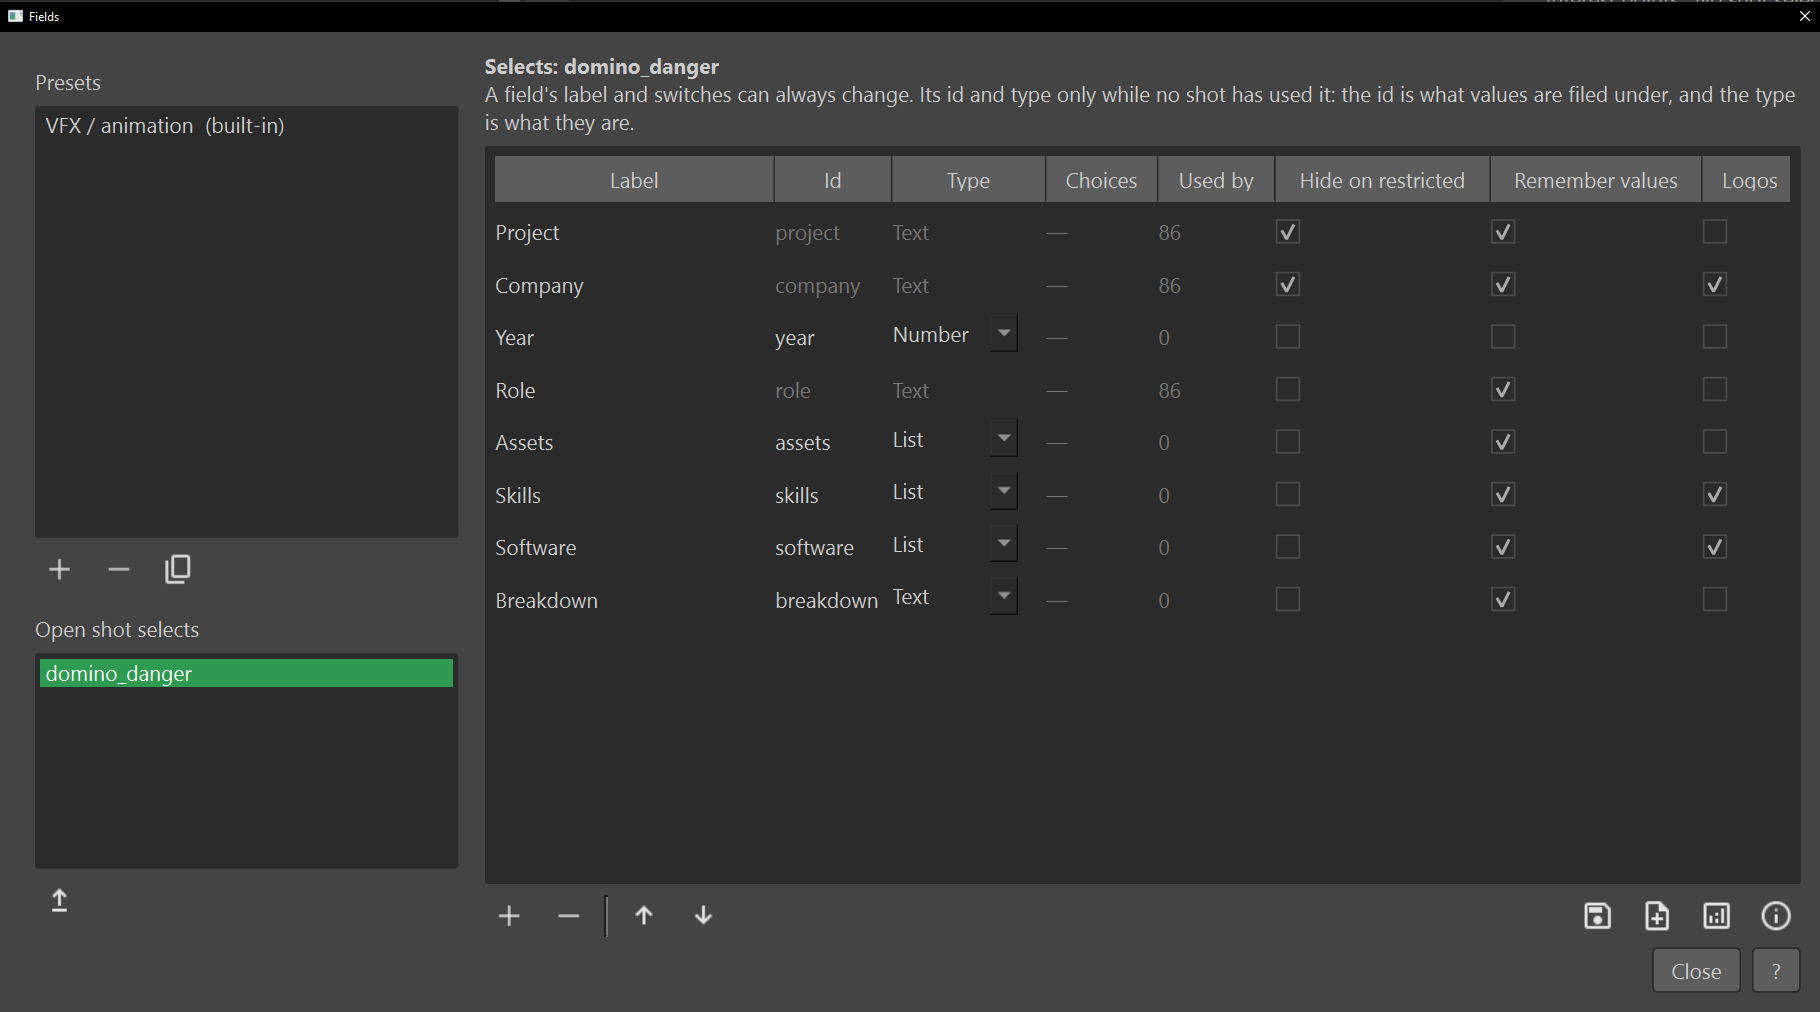
Selecting another preset or file with unsaved changes asks whether to save them, and so does closing the window.
What can change
In a preset, every cell can change at any time, because nothing exists yet that depends on it. In a file, the fields are live data, and what can change depends on whether the field has been used:
| Always | Only while no shot has used it |
|---|---|
| Label, the name in the panel | Id, what values are filed under |
| Hide on restricted | Type: Text, Text block, Number, List, Choice |
| Remember values | |
| Logos | |
| Choices, on a Choice field |
The Used by column, shown for files only, says how many shots carry a value, and a locked cell says the same when you hover it. A field you defined and never filled in stays fully editable however long ago you made it.
The reason for the split: an id is how values are stored and a type is what they are. Changing either with values already in place would leave entries that no longer match the field holding them. Everything in the left column only says how a field behaves, so nothing has to move.
Overlay templates name a field by its id
If a template shows this field, renaming its id leaves that item showing nothing until you point it at the new id. ShotWork names the templates before you rename, and does not change them: templates are shared between files, so they are not this file's to rewrite.
Add a field
- Choose the + button under the table. A row called New field appears, with an id nothing else uses.
- Type the label, and change the id if you like. Filters, export file names and overlays refer to the field by its id.
- Pick a Type: Text for one line, Text block for several, Number, List for several values separated by commas, or Choice for a fixed set of options, typed into Choices separated by commas.
-
Turn on the switches you want:
Switch Does Hide on restricted A restricted shot never prints this field on an overlay. Turn it on for anything that should not be shown publicly, such as who the work was for. Remember values Offers values typed into this field in any file. Text and list fields only. Logos Each value can carry a logo, chosen from the button beside the field. On a choice field, each option has its own. An overlay can show any field's logos whether this is on or not. -
Choose the save button.
An id that is empty, already used by another field, or one of the seven fixed fields is refused, and the old id stays. A Number field takes decimals as typed, such as 1.5; its arrows step by whole numbers, and an overlay item that shows it chooses how many decimals to print.
Change or remove a field
- Double-click a Label to rename the field. Its id stays the same.
- Double-click an Id to change it, where it can change.
- Double-click a Choice field's Choices to change them. A shot whose value is no longer a choice keeps it, shown with (not in this preset).
- Click a switch's checkbox to turn it on or off.
- The arrow buttons move the selected field up or down the panel.
- The − button removes the selected field. In a file whose shots carry a value for it, it asks first. The values are not deleted: they stay on the shots, out of sight, and come back if a field with the same id returns.
Two more buttons sit under the table. The Library button, a bar chart, opens the Library on its Field values view, where every value these fields hold across your files can be read, renamed or given a logo; the Fields window stays open behind it. The info button lists the seven fixed fields.
Bring a preset's changes into a shot selects file
- With the file selected on the left, choose the update button under the Open shot selects list, the arrows in a circle.
- In Compare against, pick the preset. The one that shares the most fields with this file is offered first.
- Read the list. Each row is one change: a field to add, a field whose label, type, choices or switches differ, the shared fields put into the preset's order, or a field to remove. A removal says how many shots hold a value in that field.
- Turn on the changes you want. Additions and changes start on; removals start off.
- Choose Apply 3 changes, where the number counts what you turned on.
The update changes only the list of fields, never a shot's values, and it is one undo step. An added field lands just after the field that precedes it in the preset, among the fields the file already has. Changing a field's type leaves its values alone, and a removed field's values stay on the shots, out of sight, until a field with the same id comes back.
Save a shot selects file's fields as a preset
- With the file selected on the left, choose the save-as-preset button under the table, the page with a plus.
- Type a Preset name.
The preset appears in the Presets list and among the choices File › New Selects offers. The file is left as it was, unsaved edits included. Saving under the name of a preset you made, in any capitalization, asks before replacing its fields. A built-in preset's name is never taken over; the new preset gets its own.
Manage presets
Under the Presets list, + makes a new preset with only the seven fixed fields, and the duplicate button copies the selected one as a starting point. − deletes a preset you made; files made from it are untouched. On a built-in preset you have customized, the same button becomes Revert to Default and puts the shipped preset back.
What happens
The detail panel shows the file's fields in the table's order for every shot. A field you removed is gone from the panel, the filter box and the overlay editor's tiles, but its values wait on the shots. Presets you saved are offered the next time you choose File › New Selects.
Related
- Field presets, for how presets and files relate.
- Describe a shot, for what the fields are for.
- Field values, for renaming a value everywhere at once.